Wednesday, June 30, 2010

Time travel, courtesy of some strawberries

I went back in time today. Approximately twenty years back as it happens, transported there by row upon row of warm, dusty red berries, nesting in straw. Who would have thought that a pick-your-own garden centre could have such a visceral effect, but there I was again, not much bigger than Ruby, with strawberry juice dripping down my chin and the sun on my back. I couldn't stop picking them.


And the peas, my other favourite things. Just to push me a little further down memory lane, Ruby and I spent a happy half hour shelling them into a sieve, eating half of them raw along the way. From field to plate in under an hour. Beat that, Captain Birdseye. It doesn't get much better.


In other news, the makeup bags have been at it again, breeding like rabbits. Honestly, they wouldn't be out of place on the Jeremy Kyle show.


In the oilcloth family way

Remember the oilcloth purse tutorial? Well, I made the mistake of not checking the sex of that first pair, and it seems that I inadvertently ended up with a boy and a girl. At least that is the only explanation I can think of, since the two of them have quite clearly been breeding. The dirty little buggers.


They have produced no fewer than four offspring. If that doesn't show a lack of self-control I don't know what does.


Like their parents, the babies are made from oilcloth with a shiny silver lamé lining, but their outer skin is a pretty Cath Kidston-esque floral which, frankly, has me doubting the paternity. And I don't know what they are feeding little oilcloth babies these days, but this lot are big. One of them could even be called obese. I blame school dinners.


We love them all the same though. Here they are, all together, the whole happy little family.

Monday, June 28, 2010

And the winner is...

Drumroll please.......

Dawn & Rose

Congratulations, you are the proud owner if the infamously spurned yoga leggings!

Email my with your details at kellyb[at]rubyinblue.com and I shall send them on their merry way to you.

Tonight is 'me' night. I am making not one, but two dresses for me, me, ME!

Of course, I wouldn't be all that surprised if I inadvertently got sidetracked into something on a smaller scale. Somehow the 'me' projects never quite seem to be realised... I'll let you know how it turns out.

Sunday, June 27, 2010

Le Quilt (aka. The Father's Day Project of Epic Proportions)

So, said the cat in the hat. So, so, so...

As promised, here are some pictures (as modeled by the small girl, who can never resist a camera lens anywhere in the vicinity) of the quilt I made for my beloved Baba for father's day, the secret project that has taken up so much of my time lately. You see, I wasn't making it up, I really was busy.


I made it using the Folk Dance Quilt pattern by Anna Maria Horner, and I love the geometric-ness of it. As a virgin quilter, it was a daunting project, but manageable. Very much a case of one step at a time.


It was machine stitched, hand quilted, and is made from 100% natural fibres. The middle of the quilt sandwich (anyone who knows the proper term for this, do please let me know - I have no knowledge in this area whatsoever) is a lightweight bamboo batting, machine washable, tumble-dryable, and perfect for snuggling up on mild summer evenings.


And so, 234 pieces, 13 yards of fabric, 60 hours of sewing, and thousands upon thousands of loving stitches later - the result is one very heartfelt gift, for one very special man.


And this is the man himself. Happy father's day, Baba. I love you xx


One day more...

Hello peeps. Just a mini announcement to say that I'm going to extend the giveaway deadline until tomorrow. The extremely valid reason for this is that I have been sunning myself on the beach all day and haven't got round to it, so, yeah, my laziness and lack of commitment are working in your favour once again. If you haven't entered already, get on it.

I'll be back later with some pictures of the quilt I made for my daddy for father's day, but in the meantime, can we all breathe a collective sigh of relief that the ritual shambolic humiliation that is England's contribution to the World Cup is over for another four years? Don't get me wrong, for a change I actually feel quite bad for all the people who really do care about football and harboured a preference as to whether we won or not – good grief, that match was painful to watch, even for me – but really, England, it's just embarrassing. Three cheers for no more vuvuzelas. Hip, Hip...

Friday, June 18, 2010

Lined oilcloth purse tutorial

Haven't done a tutorial in a while, so here is one I have been working on for a zippered oilcloth purse with a shiny lamé lining. Obviously, you don't have to use either lamé or oilcloth, but I like how robust the oilcloth is and the lamé... well, I just like shiny things, okay?

You will need:

Two rectangles 4.5" x 9" from your outer fabric;
Two of the same from your lining;
Two little rectangles 1.5" x 2.5" from your outer fabric;
One 8" zipper.

(As an aside, I have recently acquired a set square, and I can tell you exactly how much easier it makes life: a lot easier, that's how much.)


Start with your small rectangles. Fold them in half so the short sides are aligned.

IMPORTANT: Do NOT press anything in this project with an iron. You will regret it. Big, smelly, molten regret. You just need to use some firm pressure with a flat rigid edge. I used the end of the lever bit of my nail clippers (obviously) but you could use anything really. Back of a knife? Just assume that's what I'm talking about when I tell you to press folds in this tute.


Turn the short edges under by about 3/8" and press again, then do the same with the other small rectangle. These will be the little tabs on the end of the zip.


Insert one end of your zipper into one of your little folded tabs, making sure that the metal bit of the zip is enclosed inside the tab. You can trim the fabric at the ends of the zip if they are too long. Stitch straight across, being careful not to hit that same metal bit with your needle.


Do the same with the other end of the zipper, and it should look something like this


Now you are going to make a zippy sandwich. Take one of your outer pieces and lay it right side up. With the zip closed and the pull to your right, lay it face down along the bottom edge of your fabric (if your fabric has a print that needs to be a particular way up, you actually want to be looking at it upside down right now - does that make sense?) then lay your lining fabric right side down on top, aligning all the edges. The tabs will stick out slightly from between the layers. Tack it all in place. I wouldn't recommend pinning here - you get a much better result if you tack.


Stitch along about 1/8" from the zip teeth with your zipper foot. I find the easiest way is to start with the zip closed, then stop halfway with your needle down, lift the presser foot and open the zip up, then put the foot back down and carry on to the the end. It stops the zip pull getting in your way and spoiling things.

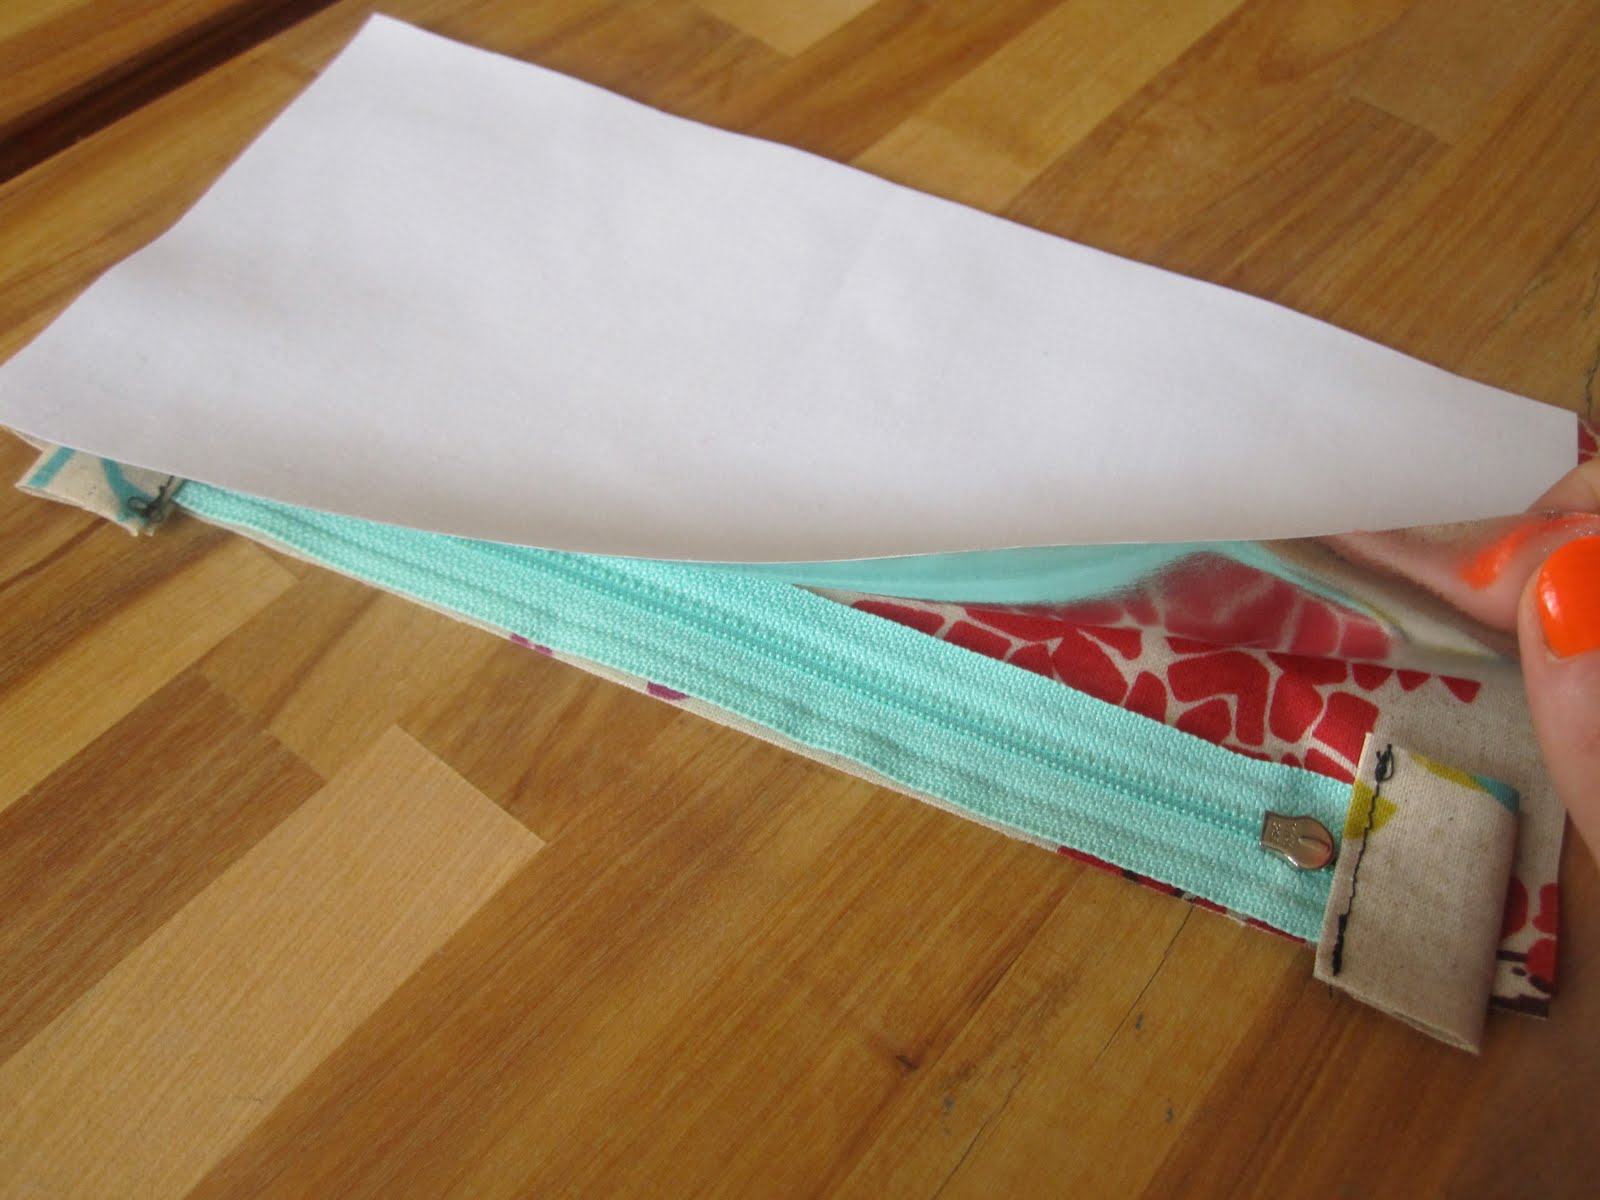
Turn the layers of your sandwich back on themselves, so that the two layers of fabric are wrong sides together. Press the folds and topstitch.


You then need to repeat this process with your other pieces. Same drill: outer fabric right side up (upside down printwise, if relevant) Lay the piece you just sewed, right side down with the zip closed and the pull to the left, and then your final lining piece right side down on top. Tack and stitch in place. Open it out like you did with the other side, and topstich. It should look like thsi:


Now, this is a little tricky to explain, but not tricky to do, honest. Make sure that your zipper is at half-open. You want to fold your nearly-purse so that the two lining pieces are right sides together, and your two outer pieces are right sides together. Align all the edges, tack in place, and sew all the way round, just missing the tabs on the end of the zip, and leaving a 2" gap in the lining part to turn it. The two things you really want to avoid here are forgetting to open your zip and forgetting to leave a gap for turning. If, like me, you forget either (or indeed both – yeah, you heard, both) of these things – don't panic, just reach for your trusty stitch ripper and start again. It should look like this:


Clip your corners and turn the whole thing carefully through the gap you left (or, like me, curse your stupidity and return to the previous step). Stitch the gap closed. Tuck your lining inside and use a stitch ripper to gently coax the outer corners into shape.


Ta-da! That wasn't so hard, was it? Looking at this now, I wish I had some metallic thread or something for the top-stitching, but on the whole I'm pretty pleased with it.


I also made a makeup bag version for my mum: Slightly bigger, and I boxed the corners at the bottom so it would stand up:


Let me know what you think of the tutorial, and any changes you think I need to make - happy sewing!

Thursday, June 17, 2010

Boom box leggings giveaway: Come one, come all

This week I have been a little naughty and splashed out on some patterns and fabric, including this great pattern for yoga leggings from the lovely Amanda over at Kitschy Coo. I made them out of what is quite possibly the coolest jersey print in creation, fabulous turquoise-green and covered in boom boxes, also purchased from Amanda's great big Fabric Bonanza Mega Sale.


They have mock-buttoned cuffs on the bottoms, and a big wide waistband that can be worn folded down or turned up to save little tummies from draughts.


The leggings and I are very much in love. Upsettingly, Ruby does not feel the same way and, what with children being unrepentant sociopaths with little or no cognisance of other people's feelings or emotions, she has no qualms with letting me know this fact, or with point blank refusing even to try them on.


My heartbreak and devastation, however, are your gain, because it means these beauties are up for grabs. They are a size 2T, but I think fairly roomy.

I'm sure you know the drill by now: comment on the post to enter, and if you blog about the giveaway or share it on twitter or facebook you get two entries (be sure to let me know in your comment that you have done so!) and I will get the small girl to pull the winner's name out of a hat on, let's see... how does Sunday 27th work for everyone?

Good luck everyone, get commenting xx

Monday, June 14, 2010

Ruby in Blue is on Facebook

Hello lovelies. I know I've been really really rubbish lately, but it's because I've been working on something BIG and it's for a certain father of mine who happens to be a follower – Hello, Baba! – and so I can't blog about it until after Father's Day.

What I can blog about, though, is the fact that we now have a new facebook page so if any of you nice folks fancy heading over there nd becoming a fan (or even suggesting it to your friends?!) it would be very greatly appreciated. And I promise that there is sewing goodness to come in the near future. Peace out x

Wednesday, June 2, 2010

Late night whimsy

So, here I am again. Silly o'clock and no sleep to be had.

But I have made a little something, which is, well, something.


It's uncharacteristically pink for me, and very girly, and yet I kind of love it. I more than love the fabric, with its fanciful print, and I love the red heart buttons that clash a bit, in just the right sort of way. I think I dodged twee by an inch or so.

I'm not sure how much wear this will get, as it really goes with nothing the girl owns, but when I saw the fabric I knew I couldn't not make it. Oh, if only she had some red patent Mary-Janes. How good would that look? Or would that be overkill? Might have to settle for Converse high-tops for now, although I kind of like the incongruence of that too.

Quiet now, brain. Hush.