Showing posts with label clothes. Show all posts

Sunday, July 4, 2010

Sunday night refashion.

Not much to report here, except that the small girl did an excellent job as flower girl yesterday. So much so, in fact, that I am considering renting her out on a regular basis to wander round strangers' weddings holding flowers and being photogenic. Gratuitous proud-mummy-shot coming up.


Tonight's project was a simple refashion: a t-shirt I have never worn (t-shirts and I have never really got along) and a strapless dress I have never worn (ditto for me and strapless dresses) into a much more wearable dress.


I'm sure the idea of refashioning is not necessarily to reduce one's wardrobe by amalgamating two existing items into one, but, as far as I'm concerned, one item I am certain I will wear is better than two I almost certainly won't.


Also, this week I have mostly been laughing at these little gems. Happy sunday folks. Peace out.

Friday, July 2, 2010

Freshly picked pinny


We had a bit of an idyllic afternoon yesterday, the small girl and I. I spent an hour running up this dress, from a great tutorial over at Freshly Picked, and contrary to all precedent or character Ruby spurned Beebies in favour of watching me. "I love watching you sew, mummy," she said, heart-meltingly, whilst proceeding to observe me, chin resting on her hands, head to one side, for a full ten minutes, before getting bored and wandering off to get some crayons and sticky things.


This sweetness was only very slightly marred by the forty-minute screaming session that followed as a result of my tying a bow the wrong way. I'm willing to overlook it though, and store the little watcher in the memory banks instead.

Thursday, June 17, 2010

Boom box leggings giveaway: Come one, come all

This week I have been a little naughty and splashed out on some patterns and fabric, including this great pattern for yoga leggings from the lovely Amanda over at Kitschy Coo. I made them out of what is quite possibly the coolest jersey print in creation, fabulous turquoise-green and covered in boom boxes, also purchased from Amanda's great big Fabric Bonanza Mega Sale.


They have mock-buttoned cuffs on the bottoms, and a big wide waistband that can be worn folded down or turned up to save little tummies from draughts.


The leggings and I are very much in love. Upsettingly, Ruby does not feel the same way and, what with children being unrepentant sociopaths with little or no cognisance of other people's feelings or emotions, she has no qualms with letting me know this fact, or with point blank refusing even to try them on.


My heartbreak and devastation, however, are your gain, because it means these beauties are up for grabs. They are a size 2T, but I think fairly roomy.

I'm sure you know the drill by now: comment on the post to enter, and if you blog about the giveaway or share it on twitter or facebook you get two entries (be sure to let me know in your comment that you have done so!) and I will get the small girl to pull the winner's name out of a hat on, let's see... how does Sunday 27th work for everyone?

Good luck everyone, get commenting xx

Wednesday, June 2, 2010

Late night whimsy

So, here I am again. Silly o'clock and no sleep to be had.

But I have made a little something, which is, well, something.


It's uncharacteristically pink for me, and very girly, and yet I kind of love it. I more than love the fabric, with its fanciful print, and I love the red heart buttons that clash a bit, in just the right sort of way. I think I dodged twee by an inch or so.

I'm not sure how much wear this will get, as it really goes with nothing the girl owns, but when I saw the fabric I knew I couldn't not make it. Oh, if only she had some red patent Mary-Janes. How good would that look? Or would that be overkill? Might have to settle for Converse high-tops for now, although I kind of like the incongruence of that too.

Quiet now, brain. Hush.

Sunday, May 30, 2010

In the immortal words of Take That... (Or: Anyone can learn to sew)


... "We've come so far."

Every time Ruby stays over at my parents' she comes back with something or other that she has begged, borrowed or stolen. Last week she came back with a little pink dress she had found hanging on a forgotten hook somewhere, the first thing I ever sewed for her.


It wasn't that long ago, maybe two years, but I'd kind of forgotten about it. I'd forgotten that when I started out I really didn't know how to sew. I just knew that I wanted to. Obviously the girl has grown in the interim so you'll have to forgive the fact that she looks like an extra from Priscilla, Queen of the Desert, but whatever allowances you make for that you will surely wince, nonetheless, to see the flaws in the shaping, the way the upper bodice gapes while the lower bodice barely makes it across her belly...


... the, um, generous armscye and the poorly finished seams.


The wonky stitching...


... the seams that didn't quite stand the test of time ...


... and the raw edges ...


... raw edges everywhere you look.


It made me really happy to see how for I've come in what seems now to be quite a short time. I've learned everything I know from sewing blogs, tutorials and books, from my marvelous mum, and from good old-fashioned trial and error. When I started I couldn't sew a buttonhole; I didn't know how to set in a sleeve. I had never sewn elastic, never used bias binding, never sewn a rolled hem or a french seam. Back then I didn't know what a placket was, let alone how to sew one. If something got ripped, or stained, or outgrown, it went to the charity shop, or in the bin. Now when Ruby outgrows a dress, I make it into a skirt. When my jeans don't fit properly, I alter them. I couldn't find a dress I liked enough to wear to my friends' wedding next weekend, so I am going to make one instead.

Two years ago I was no better at sewing than when I walked out of my last needlework class aged eleven. Now I feel as though I've always sewn. There is so much that I still want to learn, I'm standing right at the foot of the mountain, but it's not intimidating any more. I don't look at something I want to make and decide against it because I don't know how to sew in the zip, or what to do with the interfacing, or because I don't like the sleeves quite like that. Not any more. Now I look at something and work out how achieve what I want to achieve. I know that few things are as hard as they look.

So, that was the first dress I made for Ruby, which was only ever worn once or twice, which never really survived the wash, but which, like everything else I make her, was stitched so lovingly, with so much care. It was my prototype.

My other prototype turned three yesterday, but this one can't be improved upon. She's perfect just the way she is.


Thursday, May 6, 2010

Insomnia-induced creativity

If jet lag is the mother of industry, then insomnia must, at the very least, be a distant cousin of productivity. I have forgotten how to sleep. My body seems to have forgotten it needs sleep. Actually, that's not strictly true. When I do sleep, I sleep really deeply and really well, but I am down to about five or six hours a night – four and a half last night – and I am a big fan of sleeping. I love to sleep. Until I had the small one, I was a nine or ten hours a night girl.

So, while I am not necessarily thrilled about this state of affairs, it is true that fewer sleeping hours mean I have inadvertently got my wish for more hours in a day – more waking hours at least – and I have been making and doing and fixing and... did I mention making?

I have very nearly gotten my act together and finished Ruby's room. I have finally screwed the dimmer switch, which I wired in over a year ago, to its back box. I have put up the roman blind I made for Ruby's room, with my very own drill. Yes, all right, it's pink, but it's still a power tool, okay? I am woman, hear me drill things! Rah.

I have bought and bravely ridden a bike, with my precious spawn on the back, on actual roads. This clearly was not done at night, so doesn't strictly qualify to be included here, but it is kind of a big deal for me, seeing as how I haven't ridden a bike in well over a decade. It was the shame and lasting trauma of failing my cycling proficiency that did it, you see.... So I am somewhat proud of my newfound roadworthiness, and thought I'd just squeeze it in there.

Sewing-wise, I have done loads (and thrown away a fair proportion of it on account of it being embarrassingly badly sewn tat, which perhaps goes to show that insomnia is not all good – but let's not dwell on that). Success stories include a shirt-to-dress refashion using this tutorial (I'll stick a piccie up when the girl is not asleep in such close proximity to said dress), a few nighties, since the girl, for no obvious reason, has renounced pyjamas, and a nice little bunch of summer dresses and tops, all from half yards I have been collecting.

This is my pick of the bunch:

A sweet little smock top made using Anna Maria Horner flannel;

A stripy pinafore dress....

.... with a cute appliqué on the back (which, because I quite like how the heart-on-the-bum-look turned out, we are going to pretend was not accidental);

And Ruby's election night dress, a lovely soft peasanty tunic, based on this tutorial, completed at about three o'clock in the morning when the reds and the blues were neck and neck, and I gave in and went to bed.

There's also a really awesome skirt, which happens to be in the wash, but you get the point. I think I have made more in the last week than I have in the last month put together. I have also learnt that lining and reinforcing things, while taking a little more time, makes oh-so-much of a difference to the end result. So, in conclusion, as much as I am wary as to what the long term consequences of sleep deprivation may be, as long as I can keep up this kind of productivity I am not going to complain. For now at least.

Wednesday, April 28, 2010

This tute will change your life.

It's not my tute. I wish it were though. It's Susan's over at Freshly Picked, but it really will change your life.

It made my jeans stop looking like this....


...and start looking like this!


They are my favourite jeans ever, but the waist was just way too big. The pictures aren't great (have you ever tried taking pictures of your own backside? No? Give it a go some time - hours of fun) but you get the idea. And now... no more hoiking them up all day, and, even better, no more builders bum! See how the two little brass studs are closer together in the second picture? That's what we're doing here.

So, I urge you to go forth and alter. Everyone has at least one pair of almost perfect jeans somewhere. See, I told you it would change your life.

In other news, would you check out this booty (as opposed to the booty above, haha... oh, I amuse myself). My dad cleared out his wardrobe and I got these shirts. I already have plans for at least some of these, such as this and this. Now, go on, say Oooooooh...


I am, not for the first time, exceedingly grateful to have a father who never, ever, wears a boring shirt.

Friday, April 9, 2010

Sewing porn

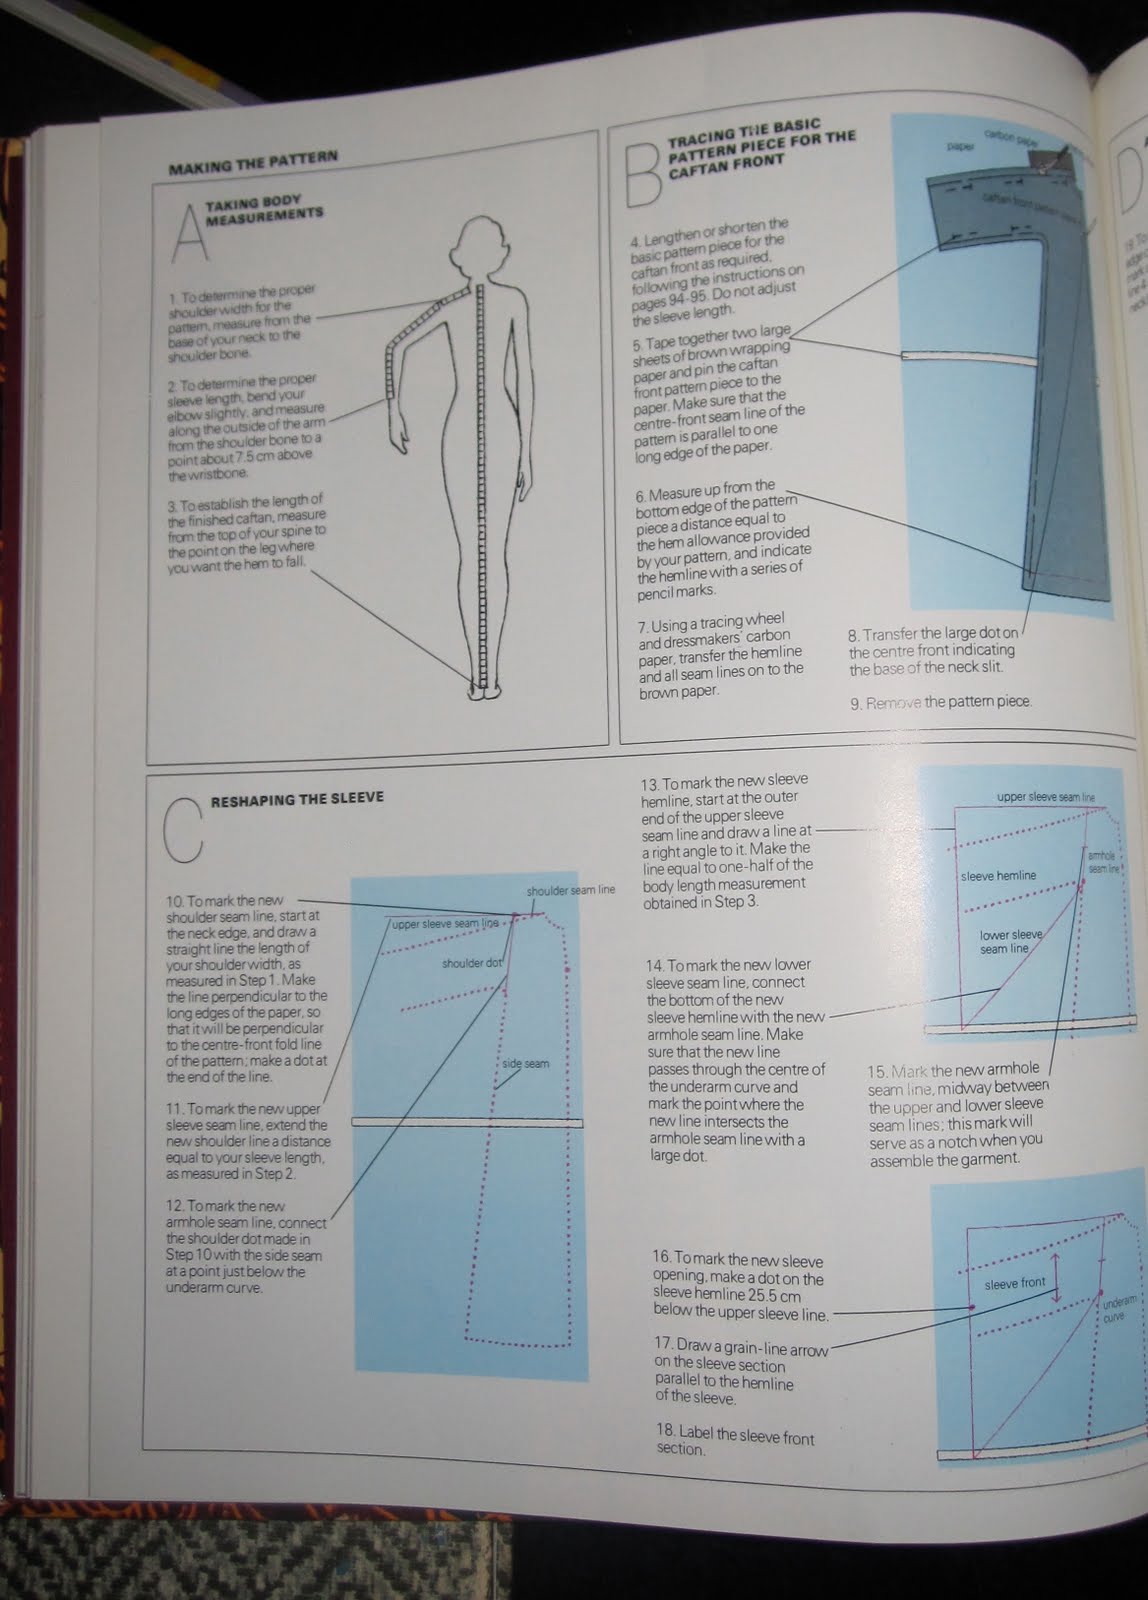
I don't have anything particularly wonderful to show off today, but I didn't want you all to think I'd been sitting around doing nothing. Oh, no. What I have been doing is perusing these nuggets of glory, given to me by my friend's lovely mum.


These books are the real deal, like yo mama used to use. It doesn't get much better. We have 'Basic Tailoring', 'The Professional Look' and, my favourite, 'Exotic Styling'. They were (more than) a little over my head when she gave them to me last summer, but now that I am getting to grips with what they are on about – despite not feeling entirely confident about being able to do what they are telling me to do just yet – I am lapping them up like a starved kitten. Yup. They are full of magnificent pictures like these...


...but even better they are packed with illustrated instructions on pretty much any formerly mysterious element of sewing you could imagine. All of which make my placket smugness look a little silly. But, man, I'm excited about all this learning. Now, if they'd just taught stuff like this in school I might have payed attention. I hope to god I'm not breaching someone's copyright by putting pictures up, but I get the impression these babies have been out of print for a while now, so I'm hoping that makes it okay.

In other news, I am working on a summer cardie for the small girl in Rowan's Kidsilk Haze on four – count them, four – double point needles. It's a while since I knitted, but I found this pattern for a cardigan that is knit all in one piece, allowing me to avoid my least favourite part of knitting (the sewing part – oh, glorious irony) and I couldn't resist giving it a go.


And in other other news, I have been taking my wardrobe apart (literally, with scissors and a stitch ripper) and refashioning things that the old me would have chucked out, experimenting with ruffles, darts and elastic. A lot of these alterations are proving to be less than successful, but, like I said, these things would have ended up in the bin anyway. Nothing ventured, nothing gained. I am also covetously eyeing a hemming foot and trying to persuade myself that it is a justifiable purchase.

All in all, there's a nauseating level of personal growth and improvement floating about. Anyone want to start a sweepstake on how long it takes before I crack beneath the pressure and go on an H&M binge?

Wednesday, March 24, 2010

Sweater to skirt in 30 minutes.

I'm going to make a disclaimer of sorts now, and say I have no idea how robust this design is – my sweater says hand wash only so that is what I will do – but if you have a sweater that is on its way to the sweater cemetery then you can't possibly have anything to lose.

I found this particular beauty for $4 in an east village thrift store, so I didn't have an enormous amount at stake. I'm not suggesting they all need to be quite this garish. You need to start with a sweater that fits comfortably around your hips. It also needs to be long enough from underarms to hem for you to be comfortable wearing it as a skirt. You can cut it shorter but not longer. You will also need a length of wide elastic, 1-2" shorter than your waist measurement.

Take the length of elastic you cut and sew a seam with the right sides together, to make what will become your waistband.

Open out the band you just made, and use a zigzag stitch to secure the raw edges. This will avoid any scratchiness on the waistband.

With the sweater the right side out and the waistband the wrong side out (so right sides facing), insert the bulk of the sweater inside the waistband, up under the arms. You will be sewing along the upper edge of the elastic.

Stretch out the elastic and pin in place at intervals around the sweater so that the stretch is even.

Zigzag stitch around the waistband, stretching it out as you go to ensure it is spread evenly around the sweater. If you are very brave and experienced you can cut the skirt first, but do so at you peril. I was such a scaredy puss that I zigzagged twice around the waistband before daring to cut.

When you are feeling secure enough in your stitching, you can cut the top part of the sweater off, following the line of the elastic. Rest assured that in the fullness of time I will think of something worthwhile to do with the upper body of your sweater.

Turn it back on itself and, voila, you have a skirt. Send me pictures of your own sweater-skirts and I'll stick them up here. Enjoy! xx

Sunday, March 21, 2010

Summer tunic with placket tutorial

So, I was going to do a tutorial for the top with the puff sleeves I made earlier in the week, but I decided to keep things a bit simple for now. This is a tutorial for a simple sleeveless tunic top with a placket, and once you have got the shape down, you can use it for more or less anything, and I will add separate tutes for puff sleeves and bells and whistles later. I based the placket on this tutorial from Made by Rae. I would suggest popping over there and looking through hers as well just to get a really clear idea of what you are doing before you begin.

If there's anything that is confusing please let me know so I can change it. It's long, with several thousand pictures, but surprisingly simple, so bear with it and thou shalt be rewarded.


You will need to pin down your victim and procure the following measurements, in inches:

- Chest, all the way around, as opposed to just across the chest;
- The length you want it to be, from shoulder to hem (mine is 16");
- Measurement around the upper arm;
- Shoulder width.

You will see that the lengths on the diagram below are marked as letters, so you should be able to make this fit your own child easily by doing a few simple sums.

C = your chest measurement divided by 4, plus 1"
L = your desired length (no sums required here!)
A = your full upper arm circumference, divided by 5 and multiplied by 4, to the nearest half inch
S = your shoulder width, minus 1", divided by two
H = C plus 1.5"

It pleases me greatly that these letters spell the word CLASH.

Cut out two pieces as below, rounding off the bottom edge as shown so that it is an inch or so higher at outside edge. Use a top you like as a guide for the neckline. You can either cut both the same, or choose to cut it higher on the back piece. Note that this pattern does not include seam allowances. For this particular project you will need to allow for seams at the shoulders, the sides, and the hem at the bottom, but the neckline and armholes will be finished with bias binding so there is no need for extra allowance here.


Using a contrasting fabric, cut two pieces for the band at the bottom of the tunic, indicated by the dashed line in the diagram. Mine was about 4" wide.

Using the same contrast fabric, you also need to cut a rectangle, 5.5" by 8", for your placket, and you will need to make enough double folded bias binding to finish your armholes and neckline (I needed about 40"). Make yourself a long piece of bias tape using these instructions, and follow the instructions for the straps on my summer dress for the folding.

Now you've got all your pieces you're ready to roll, so here goes.....


1) With the wrong side of your rectangle facing you, fold in and press 1/4" around the sides and bottom, and press in four creases, giving you five 1.5" sections.

2) Line up the centre of the rectangle with the centre of your front piece, and pin it in place, right sides together.

3) Following the creases you made, stitch around three sides of the middle section of the placket, leaving the top open.

4) Cut down the centre of the middle section, through both layers of fabric (terrifying, I know) and into the bottom left corner, as close as you can get to the seam without snipping through your stitches. Clip the bottom edge at the corners of the section you just stitched.

5) Fold and press the left flap across the centre to the right...

...and all the way round on itself so that it encases the raw edge where you just cut.

6) Pin and topstitch the edges.

7) Repeat stages 5 and 6 for the other side, only this time the bottom of the centre section needs to be stitched inside as well. You will end up with two placket pieces, one of which is attached at the bottom and side, and one which is sort of flapping about.

8) Pin one placket piece on top of the other (pick whichever one looks best) and stitch in place. Then give yourself a clap - you just made a placket! Isn't it pretty?

9) Join your front and back pieces at the shoulders and the sides, finishing the seams however you prefer. Stitch the ends of the two contrast strips together to make wide band, but do not finish the seams. Press them open instead to reduce bulk. They won't be visible when you're done.

10) With both pieces inside out, insert the main piece inside the contrast band, so the right side of the band is facing the wrong side of the main piece. Pin in place, and stitch all the way round the bottom edge.

11) Turn the top the right side out, and turn the contrast band back on itself so it's on the outside. Press and topstitch in place.

12) Turn the top edge of the contrast piece under. Press, pin and topstitch in place.

13) Sew the bias binding in place around the armholes and the neck.

14) Sew yourself a buttonhole on the top piece of your placket and stitch your button onto the underneath piece (noting how frickin' cool my cheshire cat button is as you do so)....

... and you're done!
Well done you.